Mastering the Golf Grip for Improved Performance and Consistency
Mastering the golf grip is one of the most critical steps toward becoming a better golfer. Your grip on the club directly impacts the accuracy, control, and power of every shot you take. Whether you’re a beginner or an intermediate player, learning how to properly grip a golf club is the foundation for improving your overall game.
In this guide, we’ll break down the different types of golf grips, show you how to achieve a neutral grip, and discuss common mistakes that lead to issues like slices or hooks. By the end, you’ll have the knowledge and confidence to perfect your golf grip and elevate your performance on the course.
Table of Contents
Why the right Golf Grip Matters
Your golf grip is the only point of contact between you and your golf club, and it’s what directly controls the clubface during your swing. A proper grip ensures that your hands, wrists, and arms work in harmony to produce powerful, controlled shots. Without the right grip, even the best swing mechanics can fall apart, leading to inconsistent shots, reduced power, and frustrating results on the course.
A poor golf grip can cause a number of issues, including:
- Slicing the ball: This is often caused by an open clubface at impact.
- Hooking the ball: A too-closed clubface during the swing often causes this.
- Lack of control: A weak or overly tight grip can cause poor shot control.
If you’re serious about improving your game, then the first step is learning how to perfect your golf grip. A consistent grip leads to more reliable ball striking and fewer missed shots.

Different Types of Golf Grip position
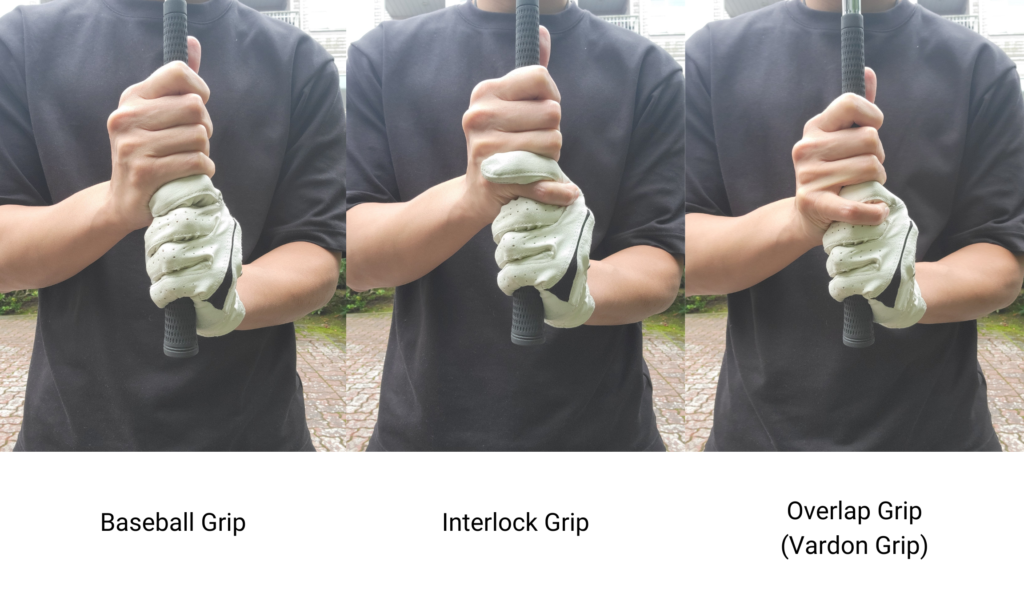
There are several types of golf grips that players use, depending on their comfort level, hand size, and experience. Here are the three most common golf grips:
The Overlap Grip (Vardon Grip)
The overlap grip, also known as the Vardon Grip, is the most widely used grip among professional golfers. To form this grip, place your pinky finger of the trailing hand (right hand for right-handed golfers) over the index finger of your lead hand (left hand for right-handed golfers). This grip provides stability and is ideal for golfers with larger hands.
The Interlock Grip
The interlock grip is favored by players with smaller hands or weaker grips. In this grip, the pinky finger of your trailing hand interlocks with the index finger of your lead hand. This provides a stronger connection between both hands, which can improve control for some golfers.
The Ten-Finger Grip (Baseball Grip)
The ten-finger grip is the most natural grip for beginners. As the name suggests, all ten fingers make contact with the club, similar to how you would hold a baseball bat. This grip is ideal for players who may not have strong hand or wrist strength and want maximum control.
Step-by-Step Guide to Gripping a Golf Club: Golf Grip position
Now that you’re familiar with the different types of golf grips, let’s dive into how to actually grip a golf club correctly. Follow these steps to ensure you’re holding the club in a way that will promote proper swing mechanics and consistent results.
Step 1: Position the Club in Your Lead Hand
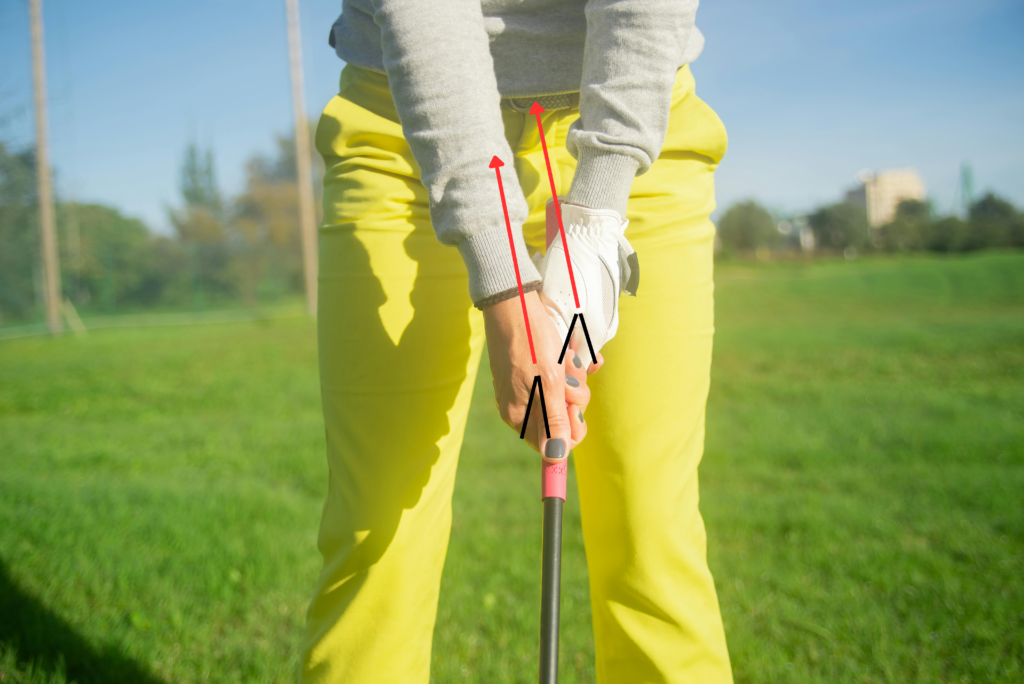
Start by placing the club in your lead hand (left hand for right-handed golfers) so that the handle runs diagonally across your fingers, not your palm. The club should rest under the heel pad of your hand, providing a secure yet relaxed grip. Your thumb should be slightly to the right of the club’s centerline, forming a “V” shape with your index finger. This “V” should point toward your trail shoulder.
Once gripped, you should be able to see the knuckles of your index and middle fingers. Seeing two knuckles ensures that your grip is neither too weak nor too strong. A weak grip will result in an open clubface, while a strong grip can cause the face to close, leading to inconsistency in your shots.
Step 2: Position Your Trail Hand
With your lead hand securely in place, position your trail hand (right hand for right-handed golfers) by wrapping it around the handle. Your right hand should support the left, with the fingers wrapping around the grip. Your right thumb should rest slightly to the left of center, with the “V” formed by your right thumb and index finger also pointing towards your right shoulder.
Step 3: Ensure Proper Golf Grip Pressure
One of the most common mistakes beginners make is gripping the club too tightly. A tight grip creates tension in your arms and shoulders, which can negatively impact your swing. You want to maintain a grip pressure of about 5 or 6 out of 10—firm enough to control the club but relaxed enough to promote fluid motion.
Common Mistakes with the Golf Grip
Even experienced golfers can make mistakes with their grip. Here are some of the most common issues and how to avoid them:
Gripping Too Tightly
Many beginners think that a firm grip will give them more control over the club, but this often leads to tension in the swing, reducing flexibility and speed. If you find your shots are lacking power, check your grip pressure. A looser grip allows for better wrist hinge and greater clubhead speed, which in turn improves distance.
Incorrect Hand Position: Understanding a Strong or Weak Golf Grip
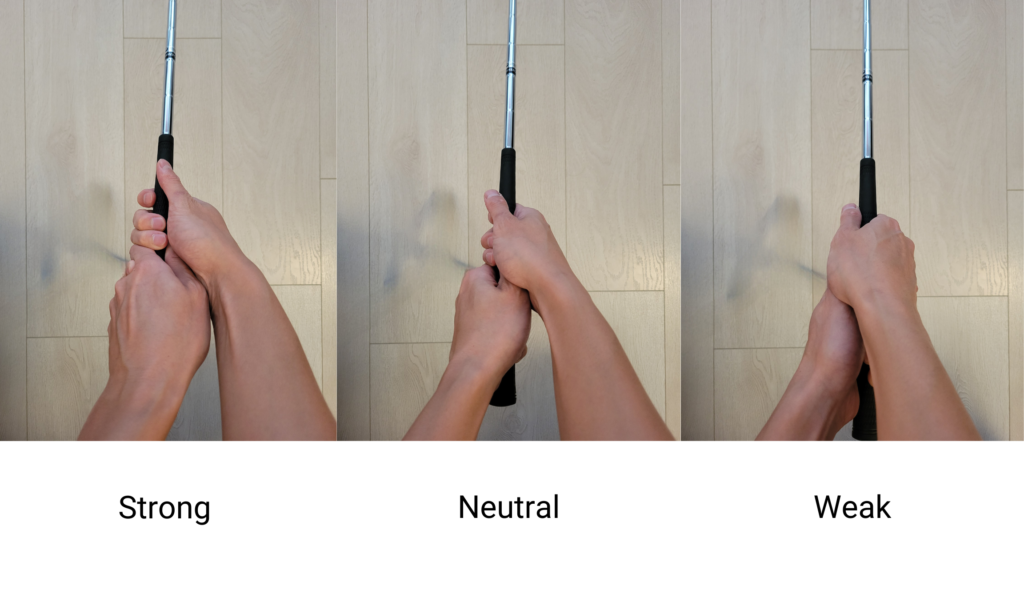
An incorrect hand position can cause all kinds of shot problems, from slices to hooks. This often happens when you have a strong or weak golf grip. A strong golf grip occurs when the “V” shapes formed by your thumbs and index fingers point more toward your trail shoulder, which can close the clubface and lead to a hook. Conversely, a weak golf grip occurs when the “V” shapes point toward your lead shoulder, causing the clubface to open and leading to a slice.
A neutral grip is the ideal balance, where the “V” shapes point somewhere between the chin and the trail shoulder (right shoulder for right-handed golfers). A rule of thumb to ensure a neutral grip is that, at address, you should see two knuckles on your left hand when you look down. Seeing more knuckles usually indicates a strong grip, while seeing fewer knuckles suggests a weak grip. Adjusting your hand position to avoid a strong or weak golf grip can dramatically improve your accuracy and control, keeping the clubface square at impact.
Grip Pressure Imbalance
Another common issue is uneven grip pressure between the hands. For example, gripping more tightly with the right hand (for right-handed golfers) can result in an overactive right hand, which might cause you to close the clubface prematurely.
Practice Drills to Improve Your Grip
Now that you understand the fundamentals, here are a few simple drills that will help you improve your golf grip over time:
Grip Pressure Drill
To improve your grip pressure, try swinging the club with lighter pressure than you normally would. Aim to keep your hands relaxed throughout the swing while maintaining control. This drill helps you find the right balance between a firm and loose grip.
Lead and Trail Hand Drills
Practice taking swings with only your lead hand on the club. This will help you feel how important the lead hand is in controlling the club’s path. Then, switch to your trail hand only. This drill builds strength and coordination in both hands.
Golf Grip Alignment Check
One quick and easy drill is to regularly check the position of the “V” shapes your hands form. Use a mirror or record yourself to ensure that the “V” points consistently toward your trail shoulder.
Final Thoughts on Mastering the Golf Grip
Mastering your golf grip is the first step to becoming a better golfer. It may seem simple, but the right grip lays the foundation for a powerful and consistent swing. By practicing the tips and drills in this guide, you can significantly improve your control and confidence on the course.
Remember, the best grip is one that feels comfortable and allows you to swing the club with ease. Don’t be afraid to experiment with different grip styles until you find one that works for you.
Whether you’re working to improve your swing or simply aiming for more consistent shots, getting the grip right is essential. Be patient and practice regularly to see improvements.


